
Set up a Raspberry Pi 3 Time Machine!
- Apple
- Linux
- #macOS
- #pi
- #raspberry-pi
- #time-machine

Raspberry Pi Time Machine
This week I received a new MacBook Pro 2017 to use as my development machine when ‘on the go’ (or on the couch, to be more accurate). I also received a larger SSD to replace the boot drive on Desktop PC, and suddenly had a 120GB SSD with no job. I decided to put it to work to hold backups of my new mobile dev machine in the event of the worst case scenario. Now, I could have just tossed it in my external enclosure and plugged it in every once in a while for backups, but I know I’m too lazy to remember to do that often enough, and backing up wirelessly over the network is just so much more convenient and sounded like the kind of project I’d have a little fun with. Below is how the process went. If you stumbled upon this, you should be able to follow along with a few possible differences depending on the model of Pi you have. Make sure to read the following before moving to the instructions, as you’ll appreciate avoiding all the issues I ran into figuring this out. Thanks to HTG for getting me most of the way there.
Requirements
Raspberry Pi with Raspbian Jessie;
** You may be able to get this to work with stretch with some modifications, but some of the commands in my instructions WILL NOT work in Raspbian stretch when installing Netatalk.
External Drive
SD/Micro SD Card and reader
Instructions
Install Raspbian Jessie Lite onto your PI. I recommend Win32 Disk Imager to write your image to your SD card if you have access to a Windows PC. Otherwise, google around for an equivalent for macOS.
! WAIT !
Before you go tuck your little headless computer away make sure to enable the SSH server. The SSH server is no longer enabled by default.
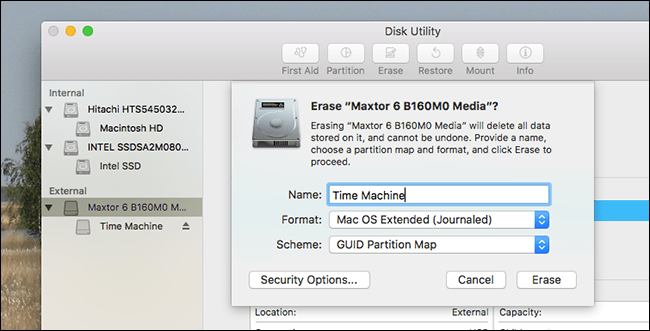
Format your external drive on your macOS machine to work with time machine.
Launch disk utility. Select your drive. Give it a name and set the format to ‘Mac OS Extended’, and scheme to GUID Partition Map. Click Erase.
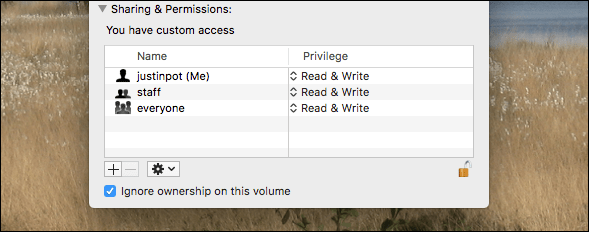
Open finder and right click your drive. Select Get Info’.

Set ‘everyone’ to ‘Read & Write’, and check ‘Ignore ownership on this volume’
Now unmount the drive and go plug it into your Raspberry Pi.
Update your repositories and update your packages.
sudo apt-get update
sudo apt-get upgrade
Install packages hfsprogs and hfsplus:
sudo apt-get install hfsprogs hfsplus
Create the following directory:
sudo mkdir -p /media/tm
Modify the permissions of the directory with this command:
sudo chown pi:pi /media/tm
Configure Pi to mount drive on start up.
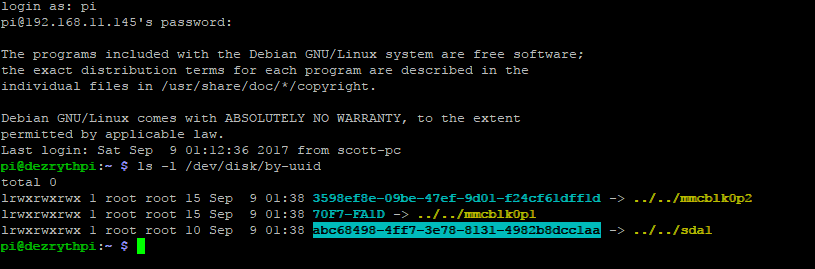
Find your drives UUID (Universally Unique Identifier) with this command:
Modify your fstab file to automatically mount your external drive on boot-up:
sudo nano /etc/fstab
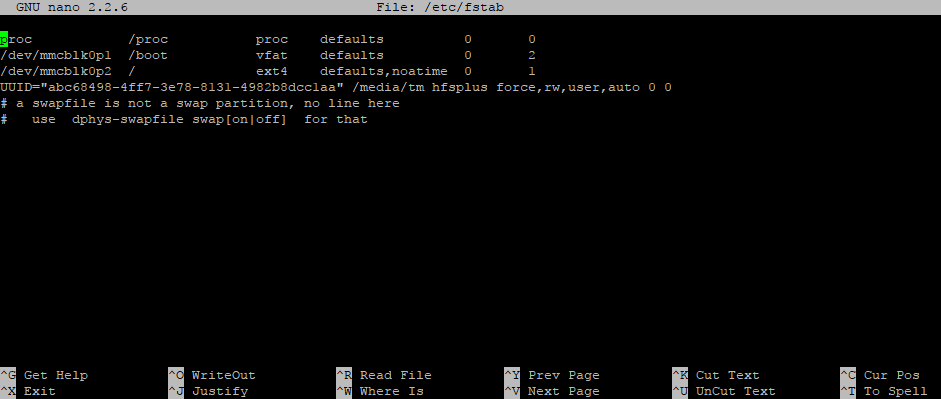
The line you want to add will look like this. Feel free to copy, paste, and modify with your UUID.
UUID="abc68498-4ff7-3e78-8131-4982b8dcc1aa" /media/tm hfsplus force,rw,user,auto 0 0
! BE CAREFUL !
Make sure you enter this correctly, as messing up here and not realizing will corrupt your fstab file and if you reboot before correcting it, your pi will not boot correctly. In the event of this, you’ll have to edit your fstab file from another Linux system to fix your mistake.
Test that your drive mounts correctly after this modification:
sudo mount -a
If you don’t get an error here, then you’re set.
Install Netatalk:
Use the following command to install all the dependencies you need at once
sudo aptitude install build-essential libevent-dev libssl-dev libgcrypt11-dev libkrb5-dev libpam0g-dev libwrap0-dev libdb-dev libtdb-dev default-libmysqlclient-dev avahi-daemon libavahi-client-dev libacl1-dev libldap2-dev libcrack2-dev systemtap-sdt-dev libdbus-1-dev libdbus-glib-1-dev libglib2.0-dev libio-socket-inet6-perl tracker libtracker-sparql-1.0-dev libtracker-miner-1.0-dev
Download the latest version of Netatalk by making sure you have the correct version number with the following command
wget http://prdownloads.sourceforge.net/netatalk/netatalk-3.1.11.tar.gz
Unpack the file:
tar -xf netatalk-3.1.11.tar.gz
Switch to the new folder created, and run this command to configure Netatalk’s settings:
./configure \
--with-init-style=debian-systemd \
--without-libevent \
--without-tdb \
--with-cracklib \
--enable-krbV-uam \
--with-pam-confdir=/etc/pam.d \
--with-dbus-daemon=/usr/bin/dbus-daemon \
--with-dbus-sysconf-dir=/etc/dbus-1/system.d \
--with-tracker-pkgconfig-version=1.0
You are now going to build the source in this folder. This takes a little while.
make
and install
sudo make install
Ensure it’s running with this command:
netatalk -V
We’ve now got to configure Netatalk
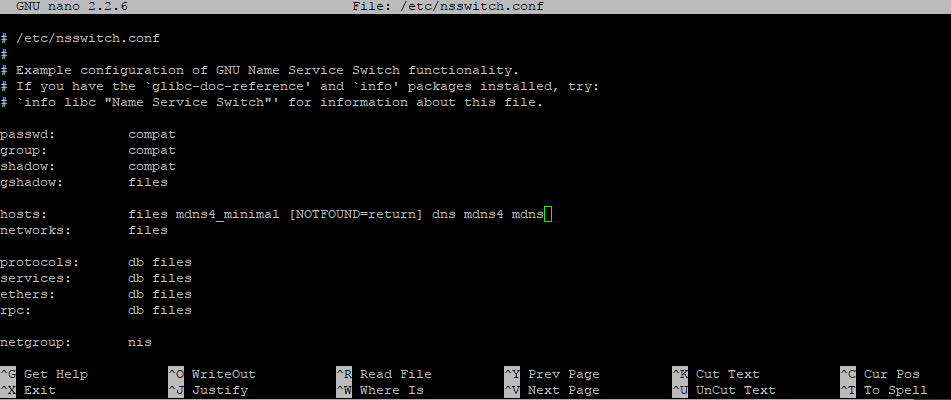
sudo nano /etc/nsswitch.conf
To get your Time Machine drive to show up in Finder’s sidebar you’ll need to add this to the line that begins with ‘hosts’:
mdns4 mdns
Edit apfd.service
sudo nano /etc/avahi/services/afpd.service
and add this block of text to the file:
<?xml version="1.0" standalone='no'?><!--*-nxml-*-->
<!DOCTYPE service-group SYSTEM "avahi-service.dtd">
<service-group>
    <name replace-wildcards="yes">%h</name>
    <service>
        <type>_afpovertcp._tcp</type>
        <port>548</port>
    </service>
    <service>
        <type>_device-info._tcp</type>
        <port>0</port>
        <txt-record>model=TimeCapsule</txt-record>
    </service>
</service-group>
Now set up your external drive as a network share.
sudo nano /usr/local/etc/afp.conf
Change the two sections that start with [Global] and [My Time Machine Volume] to this text:
[Global]
mimic model = TimeCapsule6,106

[Time Machine]
path = /media/tm
time machine = yes
Now you need to start the network services with these commands:
sudo service avahi-daemon start
sudo service netatalk start
! IMPORTANT !
Make sure you set your Pi to start these services every time your Pi boots with these commands:
sudo systemctl enable avahi-daemon
sudo systemctl enable netatalk
We’re almost done.
Now hop on to your Mac and you should see your Pi under ‘shared’ inside of Finder.
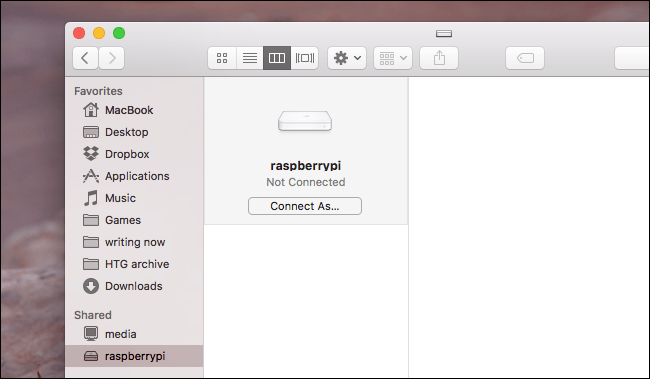
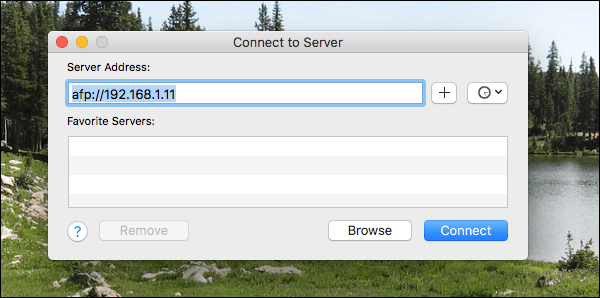
Hit ‘Command + K’ to connect to the server with your Pi’s IP address (which you should have given a static IP from your router)
Now go to System Preferences > Time Machine and select the drive as your Time Machine backup.
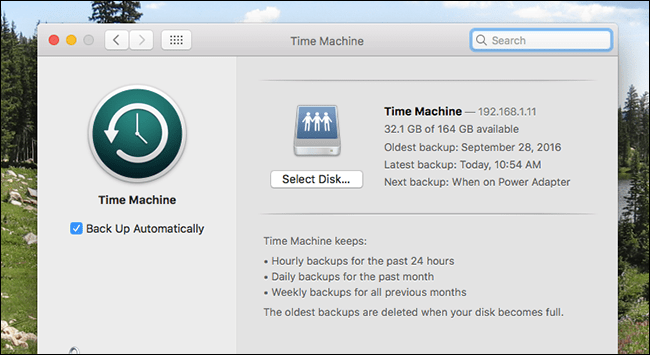
And you’re done!
Now to get a bigger drive!
You’ve now got a fully functional Raspberry Pi Time Machine
Thanks again to HTG for the initial guide I followed and for not getting upset over me borrowing your macOS screenshots.